Tuesday, October 9, 2018

DIY 2nd gen ranger intake tube on the cheap

Pro intake tube fix for less than 50 bucks!

So I have had a few questions about my ford intake tube for the cheapo shop truck. Hands down it has been the fix that has made the most improvement over everything else we've done to our little truck. With a little time you can engineer one too and save booku bucks by not buying the plastic oem replacement tube.


Early ford engines like ours (EEC IV controls our little 1993 truck) use a Mass Airflow Sensor to measure air into the the throttle body. This measurement is a key factor in determining fuel trim throughout the RPM range and any unmeasured change post air sensor can cause a number of running issues including misfires, rough idle, and poor fuel mileage. Ours had gotten bad enough that it was spitting check engine light with a recurring o2 rich code. Often times the factory plastic intake tube is the culprit for these after-MAF leaks in early ford vehicles (especially rangers and explorers). Replacements do exist, but they are limited to a factory style plastic reproduction tubes and the price tag is well over 200$. Often times It's hard to justify such an expense on a 25 year old truck, just to have it fail again not too far in the future. Even the cheap chinese intake kits cost over 100$ and used multiple clamps to create a janky series of cheap chrome tubes, definitely not our style.
Stock leaky cracked junk vs. our garage engineered fix


Enter the handyman's solution, build your own! The only fancy tool involved in our intake fix is a welder, and because of the light nature of our fabrication any small welder will do. Summit racing got the nod for parts, and the shipping times rivaled amazon prime so we were able to get our little truck back on the road in no time at all!

At this stage I just stared for a minute and pretended I was piping turbos....

We started with some of the cheapest silicone couplers we could muster. Spectre 8751 (3in to 2.5in reducer) ended up being able to stretch over our 2.75" throttle body snout without issue and Vibrant Performance 12700 would couple our new tube to the MAF bolted to the Ranger's airbox. A single 3" 180 degree exhaust mandrel bend (SUM-623009) would provide more than enough tube to connect the dots. After shipping our cart totaled $48.42, a much more acceptable alternative to 200+ dollars for the off the shelf fix.

Tubes cut, fit, tacked and ready for finish welding

From there it was a simple process of cut,fit,shape,tack and repeat. For more info on working with mandrel kits look here at our jeep exhaust build (How to Build an Exhaust in YOUR garage!). If it's your first time working with tubing angles don't be intimidated. In our rush to get this done before meatloaf came out of the oven NO measuring devices were used and it still fits great!
We don't call it Flip Flop Fabrication for nothing 


After finish welding our final little hack for this project was the 5/8" tube for the vent going to the oil cap. I didn't have any tube that fit, nor was I satisfied with a straight tube edge. For it to be proper it would require beadrolling a lip into the tube to retain the hose under any kind of pressure. While there are a number of DIY beadrolling techniques for the home handyman dinner was getting cold so out came a jeep 4.0 water pump inlet tube from the parts pile. The tubing size of the jeep heater hose is identical and the end comes complete with a nice proper beadrolled lip. If you don't have a giant jeep parts pile like I do it is dorman part #56398. It should only set you back a crisp 10$ bill from rockauto and there is enough straight section of tube to fit PERFECTLY where you need it. All finished up, we slapped on some ace hardware satin black and got it on our truck while meatloaf was still steaming.

Jeep inlet tube hacked into place

Shiny parts for junky trucks! Don't mind that comanche, its just in the process of getting a mopar 360 swap, but that's for later....

Our final intake tube fix is both durable, cost effective, and permanent. The perfect trifecta for the budget minded. Be sure to subscribe for more updates and new project cars coming soon!
Back to parts hauling duty with a smooth running 4.0!


Wednesday, May 9, 2018

10 reasons why daily driving your Rockcrawler is awesome

It's easy to tell when I'm at work
Awhile back I was sitting and perusing the internet while our newborn baby slept and I came across this internet gem "Truck Yeah-I Regret Lifting My Daily Driver" and got decidedly ruffled. I've daily driven my fair share of lifted disasters and don't regret a moment of it, how could this guy toss a lift kit on his Cherokee and hate life? It looks to me like he jumped the gun on calling his jeep ready to evaluate as a daily, so much of what makes a lifted jeep better on the road was missing. Gears for mileage, stout steering, replacing a number of high mileage drivetrain parts, thats all part of the process and contributes to peace of mind and that "I don't have to worry about that" feeling needed in a good daily car. I think he just wasn't happy with it because it wasn't done.

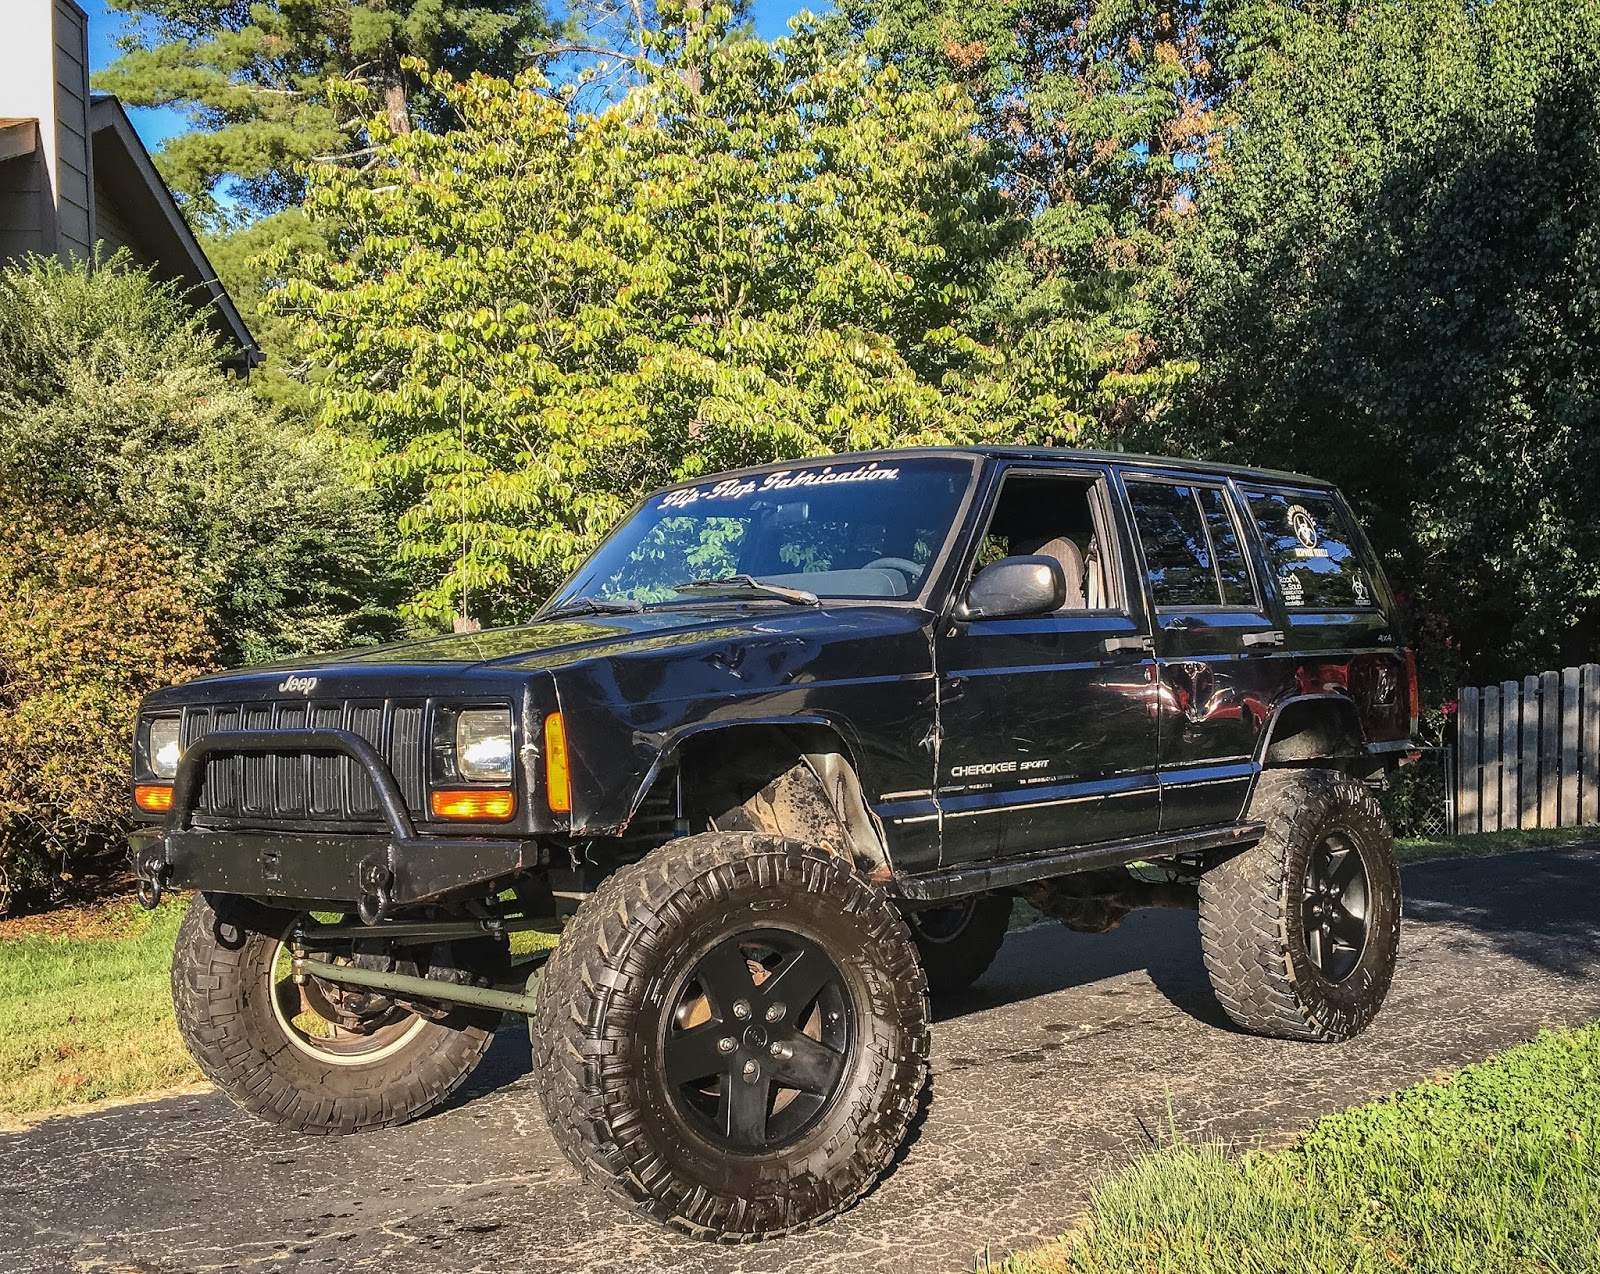
August will mark the 2 year anniversary of daily driving our lifted jeep for me. While you can find the more in depth info about our rehash here, the short skinny is it was the nicest trailer beater we've ever had. Its beat, ugly, and has been wheeled hard enough that it has a few creaks and groans that won't ever be cured. It has also has been slowly fixed and upgraded over time, and sports a nice complement of stout drivetrain and suspension parts for a little jeep on 35's. For a big slinky crawler it drives with excellent precision and the beaten down leaky 4.0 remains one of the more powerful examples of the mill I've owned (somehow, it has some decent rev limiter time on its clock as well as an astonishingly low number of oil changes). Sure there is a ton of stuff I'd like to do and upgrade, but as it sits it is a "done" package of suspension, drivetrain, steering, and armor upgrades. I like driving our jeep, and here's why.

Sneaking away during a bounty hill race to wheel some empty trails
1. Seat Time. I had never realized it but even though I built this jeep I didn't have a ton of seat time in it. Since my wife is the named owner she has driven it mostly both on and off road, I may be the local expert in spotting for this rig but she is definitely the most experienced behind the wheel. Settling in for a short drive 5 days a week has given me a chance to get to know all it's little details, where it shifts, balance, sway tendencies etc. All useful knowledge when we hit the dirt, so maybe I won't be the one that breaks it next time.

Doing the fix it dance, notice what's actually getting worked on 
2. Always caught up on maintenance. Anybody care to guess how many fluid changes my last trailer beater got? Anyone?.... ZERO that's how many. I paid 175$ for that jeep and ran the black transmission fluid for 2 YEARS! Not in a daily though! Our current rig is treated to 5k transmission services as well as 3k oil changes with high quality fluids. See what I said there about high quality too? because of the demands of daily driving as well as the occasional jaunt through woods our junk gets treated to high quality parts both in the form of maintenance parts (balljoints bearings brakes etc.) as well as quality fluids to keep its moving parts happy. The trailer queens needed to not let me down 3-5 days a year, our black jeep needs to do the same for at least 260 days a year. But isn't that a more expensive way to take care of a car? Your damn straight, but if you were already wheeling it you probably should've been buying good parts anyway, trailer queen or not. But that leads me straight into my next reason...

3. Your rig gets a bigger line in the budget. Part of adulting and rockcrawling is making sure everything fits in the budget. Often owning a 3rd vehicle or a trailer queen means its relegated to the bottom of the budget, and since we're on the toddler spending model right now sometimes off the budget entirely for periods of time. Daily drivers always need to be running and as such they get more allocated in the budget. Dailys need regular oil changes, brakes, and all the other daily driver expenses. You were going to have to pay for it anyway, might as well sink it into your rig. Spending wisely and sourcing some nice gently used high dollar upgrade parts also means that most upgrades can find their way into the budget as well.
Breaking out the air compressor after a day at the AOP.

4. Your junk is always ready. Its gotta take you to work right? that means it at least runs and drives, and running and driving is a far shorter jump to wheeling than sitting and deteriorating. The greatest enemy of a ready to use toy is sitting, clutches get frozen up, rubber seals go dry, the list goes on. When I get a rare chance to sneak out to the dirt I know my junk is ready, because it was probably parked out back at work the day before. It's a lot easier to pack the tools and pick up lunch than bring a rig back from the dead for weekend fun..
Full of as much stoutness as a dana 30 can muster.

5. It's oversuited to whatever the road has in store. We build this junk to hold up. We would be crappy rock crawlers if we didn't. The Tennessean cited a state report that insufficient roads cost Chattanooga motorists upwards of $1,400 per year in additional costs both for lost time and increased maintenance. I for one can say I've plowed the front tires into potholes in this town that would eat a little car wheel and tire for lunch, much less any other part of the suspension. Our lower links are all 1/4 wall DOM steel tubing and the joints in the lower arms are the same joints used by racers on 43" tires with 800 hp motors. If we decide we need to jump the train tracks on the way home I think it will be ok..... a commuter sedan not so much.

Waiting on Ultimate Adventure 2015 to arrive
6. It demands your attention on the road. One of the major burdens of driving this pig every day is that it asks a lot of your attention going down the road. There is no swaybar at all, the all rod end steering is super precise, and despite brake upgrades it's still good to be conscious of stopping distance. That's not to say that it is a poor driver, but nothing is automatic about how it moves (well it does shift its own gears...for now) and it will make you pay for your mistakes much like any purpose built performance vehicle. So while everyone else is texting and letting the blindspot monitor tell them when to wake up and drive, I'm focused on keeping my machine in line and watching out for the people driving the little boxes.
Cruising at 70

7. Everybody looks....EVERYBODY.
There's a lot of good and bad that comes with driving something that stands out. However there are some days that I feel like I'm driving a supercar rather than a beat to snot jeep. I get a lot of thumbs up at stoplights, people come and ask about it when it's stopped at a gas pump, I even catch people sneaking pictures going down the road. Everybody knows when I'm working because there is a big ugly jeep parked outback. I also get a lot of snide looks, but those mostly come from the tires screeching whenever I make a low speed turn in a parking lot.

Road tripping to see family
8. The gas really isn't a big deal. It averages 14-16 mpg around town which in the grand scheme is slightly better or on par with most 1/2 ton trucks. The addition of the 4.56 axle gears makes this possible. Our little jeep with an auto will still get 16-18 mpg on the highway which makes it cheaper to drive for short trips than the truck that would normally tow it. Having a proper and experienced technician do your gears can be pricey but for us it's an important part of any build that shouldn't be ignored. Spend the money on axle gears and drive your junk places!

Blast from the past getting up trail 39
9. Projects get done. Gone are the month long projects, it's one of two running vehicles that are necessary for this little family on the go. Whatever gets done to it needs to fit into 2 days and failure is not an option. While this can prove to be challenging to try and schedule major projects  (I've been kicking around swapping the front axle for awhile to a bigger dana 44) it does serve as motivation to get in gear and get stuff done instead of letting it sit for years without major drivetrain parts like it did before we moved.
Even though I'm driving now it's always been hers

10. IT'S FUN TO DRIVE!!! At the end of the day it's a barrel of monkeys drive around suburbia. I've been driving it enough that I know just how to make it dance, stand up on 3 wheels, you name it.  I drive it hard and have a good time doing it. After a long day at work I honestly can't think of a better way for any car guy to unwind than to cruise in something fun. It's precise, purpose built, geared right, and it's always ready to party.


So dude, I'm sorry you regret lifting your daily driver, that's a shame that you spent all that money to be sorely disappointed. Keep on building it though there are still a lot of super cool bolt on parts hitting the market for that old Cherokee that will make you a lot happier on the road than the off the shelf suspension kit. Me on the other hand I'm going to get dressed for work and see if I can catch a little air over the train tracks on my way in to the office.


Saturday, January 21, 2017

How to build an exhaust from a mandrel bend kit in YOUR garage!


Our little garage shop is humming now that we are wired for welding 
Our little Jeep needs an exhaust. Right now it lives in the garage under a sleeping newborn and six am is a little early for our 4.0 to be rumbling the bedroom floor. Now normally I would farm out something as simple as an exhaust tailpipe but after months of searching and asking around I was still coming up short on a reliable exhaust shop here in town. For someone who is particularly picky about how his rigs are put together hearing that most of my enthusiast buddies had no exhaust shops they would trust with their own cars is pretty disheartening. In yet another f*** it I'll do it myself moment we wired up our garage for our trusty 220 welder and set to stacking up the parts we needed. We pulled this little number off with minimal special tools (angle grinder, welder, a few angle measuring devices) so we're going to show you that any garage enthusiast with a little weld know how can put together a clean custom exhaust for your rig.

Problem 1, our two chamber muffler from our original build was used as a skidplate for a number of years, at one point it was pushed up so hard that it put a nice muffler shaped dent in the floor.

Problem 2, our cobbled together system dumps underneath the jeep directly on top of our 8.8 (notice the big black stain). It was fun and loud while we lived on the trailer, but for a family crawler/overlander its just not a safe and quiet setup.

Since budget is always a factor we gave the nod to Summit Racing for some universal exhaust parts. For our setup we selected some 2.5 inch 180 degree mandrel bends, some extra tubing, and a Summit racing 409 welded stainless muffler. The Summit parts seem to have a high function to dollar ratio and at half the cost of its Magnaflow equivalent it was a gamble we were willing to take. 

As luck would have it the two 180's were enough to get this project done, we only ended up with 1/2 of one left. We bought too much straight pipe but it's cheap and good to have around.


The swazall made quick work of our old beaten exhaust.


First we got our straight pipe in and our muffler slipped on to check fit. The muffler has some pretty long ends on it so we made sure we left enough on our pipe to fine tune the position once the rest of the system is built. And before I hear anyone pipe up about the lack of catalytic converter don't worry, our unit is a 2000 and maintains the two cats in the headpipe to remain emissions legal.

This handy dandy little harbor freight angle finder was a big help with eyeballing the tailpipe angles. I sometimes find it helpful to work with a piece of scrap tubing to make sure the tubing will fit along the route we plan on taking.

To cut out the angle we need we draw out our angle we eyeballed onto a sheet of cardboard and line up the start of the bend with our horizontal line that our angle is measured from. Make sure the start point is centered between the tubes and take note of the distance from that point to the pipe. That is the bend radius (in our case 9.5cm) and it will be important for future cuts from this bend. 


It's best to tack as many of the small pieces together outside of the vehicle. Up underneath it can be difficult to keep everything positioned right for tack welding so its best to work with large straight sections at once.


After a few measure, cut, fit, tack, repeat cycles our tailpipe really started to take shape.


With our tailpipe all tacked together it's as simple as finish welding our pipe out and checking to make sure the system fits together.


A quick coat of high temp black to protect our welds and it was time for reassembly

We picked up a few different hangars for the end of our tailpipe but none seemed to fit all that well. Instead we ended up welding a parts store clamp to a piece of another hangar from the scrap pile. Cheap and effective, The solid mount may transfer a touch of vibration but it should be durable enough that we wont really ever have to mess with it again.

Our finished setup looks and fits great and our 4.0 has a much more subdued growl for sneaking out to work early in the wee hours. In exchange for a few hours of work and the price of having a tailpipe bent at one of our local hack exhaust shops we have a super clean and serviceable system that's big enough to handle whatever direction any of our future engine upgrades may go. Something like this is a great project to knock down for the beginning fabricator since most exhaust tubing can be welded together with a smaller less costly 110v welder. In addition materials are much less expensive than structural projects (rollcages, bumpers, etc) so if your pile of oops tubing cuts gets a little big you won't be out major dollars. With this project off the list we're closing in on our rear axle refresh so our little crawler turned family hauler can hold up to distance driving as well as the occasional beating in the dirt. Until next time, keep on jeeping every day!

Sources:

Summit Racing: www.summitracing.com


Wednesday, November 30, 2016

Save Money, Drive Your Rockcrawler! Hashing our Trailrig XJ Back Together for Daily Duty

   Life, it happens quick and you've got to step fast to adapt. This was the case for us as we moved into our new house and I finally had a chance to begin to set up our new garage and start knocking off a list of long awaited projects on my pair of Jeep Comanche trucks. Two days into our stay we discovered that we were pregnant with our first child and everything changed. With mounting medical bills and frugal thinking we decided it was time to move on from our two seat Comanche projects and focus on acquiring a smaller family car that would be a little more economical than our big block Suburban. We sold my daily driver longbed comanche and managed to sell off a number of spare parts in the way, but we still couldn't seem to find enough room in the budget to purchase a family car and put a sizable dent in mounting medical bills. At a moment where I wasn't sure what to do about our situation someone gave me some sage advice. "Stick to what you guys know and are comfortable with," He told me. Right then I knew there was one more option in our bag of tricks, my dearest wife's trail rig.  In the past 5 years it has probably seen more trail miles than street, and it has numerous scars to prove it. It has its fare share of issues, coming hot off the heels of another major rebuild and a summer of wheeling had left it put together with a mix of solid new parts and some less than trusty used units. But keeping old rockcrawlers together on a shoestring budget is what we know how to do and we're pretty good at it around here. So without a second thought we wrote the check, zeroed out balances, and got ready to get the old rockcrawler ship shape for its most important job yet.


Our slinky little XJ sports a homebrew 3 link suspension with a mix of 1.25" and 3/4" rod ends. Since we often find ourselves in line behind much bigger and more capable rigs we need every advantage to keep up, and our overbuilt front suspension has always performed well. 
   The jeep, affectionately referred to as The Abyss Jeep by my wife, is a 2000 XJ Cherokee we bought back in 2011 to replace her dying Pontiac car. Soon after purchase we decided to build it as a street/trail rig for her. The original buildup was chronicled in numerous build threads but the most complete of the original build was here Project Girly Jeep. From there we wheeled it hard, for a number of years. After many broken axleshafts, stripped ring and pinions, and scores of body damage later it found itself laid up in our garage indefinitely waiting on a front axle.
A great many trail rigs die looking like this, and ours came close. The old jeep was surfing jackstands for well over a year until roller axles went in and it moved south with us.

   From there life took us to Chattanooga and some roller axles were hastily tacked in so that it could follow suit. Another mad rebuild ensued with yet another set of axles along with a super bling Rocksolid Fab steering and track bar setup. It spent most of that summer on the trailer, getting an occasional beating and then tucked back away into storage until it's next turn out. The setup is basic, it sports a locked high pinion dana 30 and Ford 8.8 with a spool and super 88 kit from Superior axle. 4.56 gears keep the wheels turning and a homebrew front 3 link keeps the axle located. It's built around a 35 inch tire, and for the forseeable future we plan to stick with that size. Other than its drivetrain and suspension modifications its still pretty much a run of the mill xj creeping up on 180,000 miles.

Out wheeling prior to our brush with 4Wheel and Offroad's Ultimate Adventure 2015
    Our first round of rebuild focuses on long overdue drivetrain maintenance and some comfort items needed for being a daily duty family rig.


    We started by stripping the front axle bare to replace all the bearings. A shaky pinion bearing had sidelined us from our once a week fun drive, and it was best to take the chance to get it done while we still had another jeep around to drive. Further inspection revealed our rear pinion bearing was trash in our 8.8 as well so bearings were ordered. The rear axle currently still needs attention but we'd rather live with a little gear noise and wait to rebuild when we can replace the spool with a selectable rear locker.


   Now completely reliant on this pile as a daily driver and flush with some extra cash leftover from the sale of my longbed Comanche we were able to invest in a few new parts. Our only disappointment was this disaster of an acdelco remanufactured steering box. A blockage in the box caused the death of two power steering pumps. Our burning need to both go to work to our jobs on opposite sides of town meant disassembling my remaining trail rig project and moving it's steering box and components over. This surely wasn't the first time having a spare jeep around paid off, and it surely won't be the last.


   As winter approached our last big obstacle was the lack of any kind of climate control. What good is a family rig that freezes out the kids in the winter? A new heater core and AC evaporator meant that it was time for the dash to come out, an operation that in this old rockcrawler proved to be a long dusty affair.


    The HVAC box was treated to a good clean and some all new cores. Thankfully the removal and installation of the HVAC control box and dash went much smoother than our steering box disaster. After a good solid 8 hour day we were back in business with heat and a refreshed AC system.


I even gave it a bath and shined the tires to complete the effect.
     We finished off our rebuild with some very used 35 inch Nitto Trail Grapplers wrapped around a set of 17 inch JK takeoff wheels and wheel adapters. The 17" wheel and tire combo has proven to be great for dual purpose use and even in their well worn state the Nitto Trail Grapplers handle the road and the trail better than any other MT style tire we have run. We have already put a number of miles under our little trail rig's belt as a DD and it has continued to impress. Time and money spent in the right places on our well worn XJ have helped it rise to the challenge of everyday driving and kept this little family smiling all the way to the bank.

Between writing and posting our baby girl was born and both baby and momma are happy and healthy! We're all looking forward to the adventures ahead in our little family XJ!

Back at home in its other natural habitat, a parking spot outside work.

Thursday, April 2, 2015

Bombshell Betty v3.0: Part 1, The Evolution of a Flatfender

Betty is a testament to the ability of a light, nimble trail buggy.
Her builder plans on retaining this these important qualities
 in the next rendition.
You can learn a great deal about a builder by taking a good look at what he is driving. For most, their own rig is always a testbed. Its a vehicle to push the envelope of your ability and knowledge to gain the experience of doing what you've never done before. For Tyler Garret of Rock Solid Fabrication, that rig has always been Bombshell Betty, his 1946 Willys Flatfender. Just like an employee on the payroll, Betty has evolved and grown with the business and her builders skill. Powered by a 4.3 v6 turning two stoutly built dana 44 axles held on the ground by 4 ORI struts, Betty is rarely denied most places she goes. However as her builder's skill improved the next evolution was hurtling closer. Once the right stack of parts was assembled it was time to bring her in for deconstruction.

Wheeled once and not even washed. Betty came into the shop for a complete deconstruction. Every piece of drivetrain, suspension, and axles were to be removed. Since major chassis modifications were to be made to accommodate the new drivetrain the modified yj frame that forms the lower belly of the chassis was to be completely removed as well.
 Out came the venerable throttle-body injected 4.3. This motor has rested in this jeep as long as I have known Tyler and it has never had an issue through the many relentless beatings I've witnessed. The old chevy v6 has been wearing a host of modifications for many years and has definitely proven itself as a reliable engine, however as with all things it was time for something with just a bit more go.
Stripped of all drivetrain and wiring it was time to meet the sawzall. With much of the lower chassis going into the scrap pile, the plan is to rebuild it as a tube buggy to overcome the deficiencies of a modified production frame. The end result will retain the nimble qualities of the flatfender platform with the power and precision of a tube chassis.

Full fresh start! The whole chassis was completely cut out to accommodate the new LS drivetrain as well as much more improved suspension mounts.
The heart of version three is a 6.0 liter lq4 mated to a 4l60e and an Advance Adapters  3.0 Atlas transfer case. Sadly the long tube headers didn't make the cut, as the collector ran directly in the path of the driveshaft.
 If the motor seems like it fits all too well its because Betty was designed with future ls power in mind. The motor sits very tight in the chassis and is slightly offset to the passenger side to accommodate the drivelines as well as offset the drivers weight. Achieving a better weight balance and center of gravity were important goals in the redesign.
New front frame tubes were bent and tacked.
As well as the drivetrain cradle
The end result is a chassis that is much slimmer with the ability to tuck all the suspension components flat on the skid and deliver a much better center of gravity. Stay tuned for more updates as we really start to throw some tube at the chassis.