Thursday, April 2, 2015

Bombshell Betty v3.0: Part 1, The Evolution of a Flatfender

Betty is a testament to the ability of a light, nimble trail buggy.
Her builder plans on retaining this these important qualities
 in the next rendition.
You can learn a great deal about a builder by taking a good look at what he is driving. For most, their own rig is always a testbed. Its a vehicle to push the envelope of your ability and knowledge to gain the experience of doing what you've never done before. For Tyler Garret of Rock Solid Fabrication, that rig has always been Bombshell Betty, his 1946 Willys Flatfender. Just like an employee on the payroll, Betty has evolved and grown with the business and her builders skill. Powered by a 4.3 v6 turning two stoutly built dana 44 axles held on the ground by 4 ORI struts, Betty is rarely denied most places she goes. However as her builder's skill improved the next evolution was hurtling closer. Once the right stack of parts was assembled it was time to bring her in for deconstruction.

Wheeled once and not even washed. Betty came into the shop for a complete deconstruction. Every piece of drivetrain, suspension, and axles were to be removed. Since major chassis modifications were to be made to accommodate the new drivetrain the modified yj frame that forms the lower belly of the chassis was to be completely removed as well.
 Out came the venerable throttle-body injected 4.3. This motor has rested in this jeep as long as I have known Tyler and it has never had an issue through the many relentless beatings I've witnessed. The old chevy v6 has been wearing a host of modifications for many years and has definitely proven itself as a reliable engine, however as with all things it was time for something with just a bit more go.
Stripped of all drivetrain and wiring it was time to meet the sawzall. With much of the lower chassis going into the scrap pile, the plan is to rebuild it as a tube buggy to overcome the deficiencies of a modified production frame. The end result will retain the nimble qualities of the flatfender platform with the power and precision of a tube chassis.

Full fresh start! The whole chassis was completely cut out to accommodate the new LS drivetrain as well as much more improved suspension mounts.
The heart of version three is a 6.0 liter lq4 mated to a 4l60e and an Advance Adapters  3.0 Atlas transfer case. Sadly the long tube headers didn't make the cut, as the collector ran directly in the path of the driveshaft.
 If the motor seems like it fits all too well its because Betty was designed with future ls power in mind. The motor sits very tight in the chassis and is slightly offset to the passenger side to accommodate the drivelines as well as offset the drivers weight. Achieving a better weight balance and center of gravity were important goals in the redesign.
New front frame tubes were bent and tacked.
As well as the drivetrain cradle
The end result is a chassis that is much slimmer with the ability to tuck all the suspension components flat on the skid and deliver a much better center of gravity. Stay tuned for more updates as we really start to throw some tube at the chassis. 

Tuesday, January 6, 2015

Moab, The Land of My People

When a big green bus with a jeep on the back pulls up just get on
and don't ask questions
       If you're interested enough to be reading this then I'm going to tell you now, you just need to go there. It doesn't matter what your flavor of outdoor adventure is, figure out how to get to Moab at some point. I know, everyone else has been telling me this for as long as I've been wheeling and I too continued to brush it off. Trust me, find a way to get there, especially if 4x4 is what makes you tick.  Honestly I really didn't see myself going for quite some time. Having been married only a year to my beautiful wife and starting a new job in a completely new industry it seemed some of my bucket list adventures would have to wait just a moment for life to settle down and make a little room. That was until my phone rang with an offer I couldn't refuse. My good friend Tim needed a copilot in the bus and the fare was cheap. Clothes went in a suitcase and I borrowed a camera (just a little too nice for me) and I headed out the door for the next 10 days without a clue of what to expect. 
Westbound bus!

Axleshafts on the wall at Oreilly's? Yes please.
     What we found in the town of Moab, was nothing short of a model home for outdoor enthusiasts. Any stop in town was accompanied by the noise of big tire knobs rolling down main street or that ever distinguishable sound of a Polaris RZR cruising by. Built adventure vans and big 4x4's are the norm, not the minority here. Our first night in town we found ourselves eating at the Moab Brewery for Thanksgiving, surrounded by pictures of old jeeps and every kind of outdoor enthusiast you could imagine. Indeed every town needs to be more like Moab.
Goose Island Campground was our home
sweet home for the week


       We set camp on the banks of the Colorado River and across from the massive cliff that marked the border of Arches National Park. For an "uninitiated wheeler" from the east coast, wheeling on public land is a bit of a mind boggling fact. Anywhere on the east coast, if you lock it in 4wd off pavement you better know where you are and you better have the right permission. Without it could mean heavy fines or use restrictions from larger parks. Each time waivers are signed, money changes hands, passes are checked often etc. Our first day on the Hell's Revenge trail we were amazed that we payed the toll (5 measly dollars per vehicle!) and were handed a map. Though nobody in the area seems to take access for granted. We saw only enough trail trash in one week to not even fill a shopping bag. East coast private parks continually fight the battle with irresponsible users and they check everyone at the door! The care shown by the majority of land users in Moab is fantastic, it is comforting to see coming from a place where we are continually fighting misuse and closure. To be able to four wheel on such beautiful and challenging geography is awesome.

Point your camera anywhere, Moab doesn't take a bad picture.
You think you're a good driver until this guy rolls though and
crawls everything

        The town is great and having access to all of this is awesome but the real reason to get there is to just experience it. I found in our 7 day straight marathon of trail riding, that it doesn't take a rock buggy to get out and fully experience all that Moab has to offer. In fact, many of the 4x4's that passed us ranged from buggies to small daily driver jeeps. All running the same trail, each just as interested in watching the other crawl through. Asking questions about rigs and peeking underneath the hood is usually the norm on most trails, Everyone is cut from the same mold at least a little bit. What struck me on the trails of Moab is how cross-cultural every outdoor enthusiast seemed to be. Instead of just other jeepers, hikers and runners were asking to crawl underneath for a closer look.  It's great because everyone identifies with each other as an enthusiast of the outdoors no matter what vehicle we use to get there. For hardcore rockcrawlers like us, there are places that offer much more of what we like to do; we could have very well driven to Johnson Valley and wheeled boulder strewn canyons all week. What couldn't be matched was the sense of community I felt as an outdoor enthusiast. Nowhere did we feel out of place, we were just the dirty jeepers sitting down for a bite to eat in the midst of every other outdoor nut in town. For that week,  all we saw were smiling faces and a willingness to help a bunch of east coast rednecks find their way in Moab. Before we even arrived in town, our second tow rig experienced major trailer failure. In all three parts stores and the tire shop (who happened to have exactly the 2 wheels we needed!) we found nothing but experienced and truly helpful people who jumped through a few hoops to get us on our way safely. A slew of parts were ordered, most which were destined to back on the shelf since we were unsure of what we would need after the dis assembly process. We even got a phone number and address from a transplanted east coast wheeler working at the tire shop, He absolutely insisted we go wheeling with him the next time we were in, and when we asked about lunch he directed us to his wife who worked at the Moab diner. Being back in the hustle and bustle of city life, it's easy to miss the kindness and hospitality of Moab and its residents.
Pritchett Canyon trail was by and large our favorite.

       Seriously, just figure out how to get there if you haven't been. I'll say it to anyone who asks, just find a way. It doesn't take a rock buggy and a crazy tow and toter setup. Put a small to medium sized rig together and get there. Everyone can find an adventure here if you can just take the plunge. For us east coast wheelers half the adventure is just getting a jeep to the other side of the continent. Take your rig, no matter how big or small and use it for what you always meant it for. I promise the adventure itself will be its own reward. I'm currently trying to figure out how to get back as soon as I can, hopefully with my wife and my own rig in tow. Until then you can find me around a campfire somewhere back east telling a story or two about our crazy trip out west.

Oh and don't forget to take a good camera, trust me on that.

Thursday, December 18, 2014

The First of Many

Amateur strikes again, the one group picture is blurry
The can of Guinness  was cold in my hand while we all stood too far away from the campfire. My choice of fireside beverage seemed to do me no good against the cold Utah evening. Guided by cheap headlamp I watched as three of my closest friends proceeded to recharge and retune a set of ORI struts right in the middle of a BLM campground in Moab, Utah. No race trailer full of tools, no Peterbilt hauler with a cold fridge and a leather couch. Just a few guys, wrenches, beer and a generator, in case times required the silence be broken by a spinning angle grinder. Just wheeling like it should be, an adventure all of it's own kind. 

Taylor Gilliland launches his JK aptly named Big Booty Judy up a
ledge deep in the Pritchett Canyon trail Moab, UT.
My adventure had called and I was happy I had the sense to say yes and make it happen. Being in a place like Moab brings so much of what we are as an offroad community into perspective and reminds us why we pour our time and resources into what is better termed a lifestyle than a hobby. The end run is always to stay wheeling, to get the fix of adventure that driving to work and back simply never provides. We pour blood sweat tears and good green american money into vehicles with no resale. Welders and benders are bought with tax returns and pennies saved. The extra ten dollar bill found in the dryer always ends up buying cutting wheels for that one project that just needs to get done. As long as it means we're still wheeling it's time and energy well spent. 

The beloved Ugly Truck climbing Mason Jar
in Harlan, KY July 2014
I had to return home to realize that my adventure had been happening much longer than just that week in Moab.  I looked back at all the wheeling stories and pictures and good times I've had over the course of ten years and realized I had been living my dream since I first turned a key that said "jeep" on it. Sure I haven't been racing or been a part of the industry with a stable of vehicles covered in the finest parts, but I have done a lot of wheeling, building, bashing and repeating. So much so that it's become a big part of who I am and what I am good at. So now as I start the next adventure of putting together the rig that will keep me wheeling for a long time I think about everyone else out there who is just as hooked on the adventure as I am. Were all still out here balancing family, careers, garage time, learning to weld, screwing up our first tube bends, just so we can just keep our junk together and spend a Saturday out in the woods. I think it's a story worth telling, and I sincerely hope it's a story that's worth reading. 

So look forward to build stories, trip reports, small projects, and rig features of whatever cool I see wheeling around. Because half the fun is checking out what other like minded gearheads have put together in their own garages. We all fight the same battle everyday, were all just trying to stay wheeling. Keep paying attention to my page on facebook (Facebook.com/sparepartsoffroad) for updates or follow me on instagram (@flipflopfabworx). In the meantime I'll be digging through the change jar and trying to drum up some spare parts to keep my junk out on the trail.


Hdoffroad Engineering's xj frame stiffeners

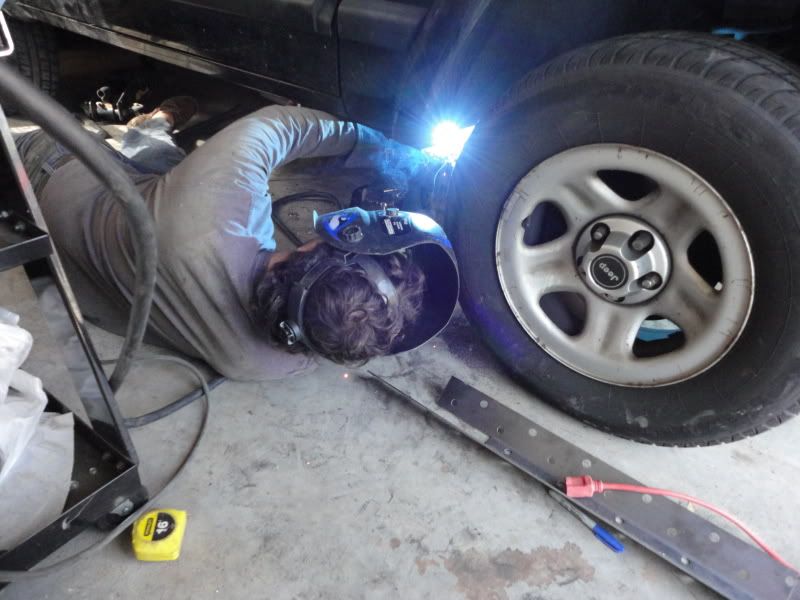
Today im going to cut my teeth for product reviews with HD offroad engineering's frame stiffeners. Anybody who has wheeled a Jeep Cherokee XJ knows that the unibody "frame rails" are very thin sheet metal (layered 16 ga. in some areas). This frame creates two very significant problems for the xj enthusiast, 1. the frame is very susceptible to denting and damage and can lead to overall unibody fatigue with hard use and 2. the light duty frame provides a poor structure for custom parts (suspension crossmembers, cages, rocker protection etc.) To solve these problems HD offroad engineering has developed their version of "frame stiffening" sleeves for the Jeep XJ. These consist of 10ga steel plate formed specifically to the xj framerail and drilled for rosette welds. The frame stiffener's i'll be installing today extend from the front lca bracket to the front of the leaf spring bracket, but HDoffroad offers a full stiffener set that consists of three pieces that cover the front frame section all the way to the rear of the jeep.

Install
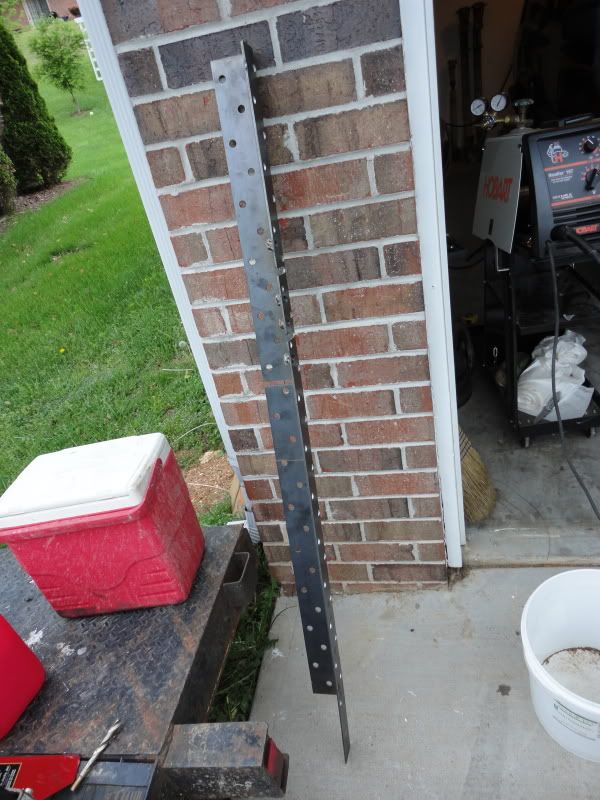
The stiffeners come pre formed for the shape of the xj frame with the exception of the small rise that occurs just behind the transmission crossmember, however the stiffener itself is also segmented for this bend in the xj frame so not to worry. Here is the freshly unpacked stiffener-
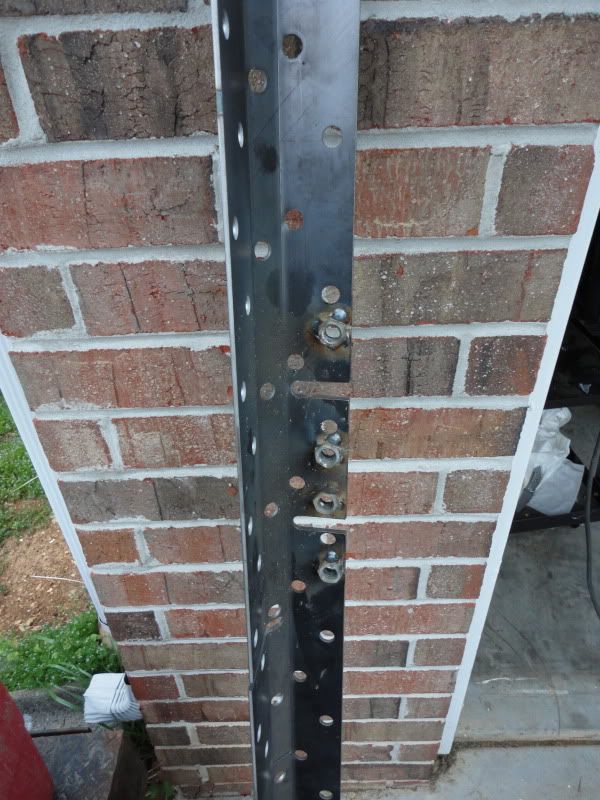
The jeep receiving this set of stiffeners is also getting a custom suspension that needs a strong mounting point for the crossmember. In order to accomplish this i welded 4 half inch grade 8 nuts to the inside of the siffener. This will provide a stronger point to mount the suspension and spread the load to ease the strain on the light duty framerail. In this photo note the slots pre cut into the bottom side of the stiffener for the factory crossmember bolts.
These slots provide the benchmark with which to locate the stiffener properly on the framerail. To prep the jeep I used a 36 grit flap disc to strip the framerail of all paint and undercoat. No jeep is the same and some will have more undercoat than paint or vice versa. Luckily the rails on this 2001 xj were mostly paint and came clean easily. It is important to get the framerail as clean as possible and continually check the fit of the stiffener to make sure all the edges have enough clean metal to weld to.
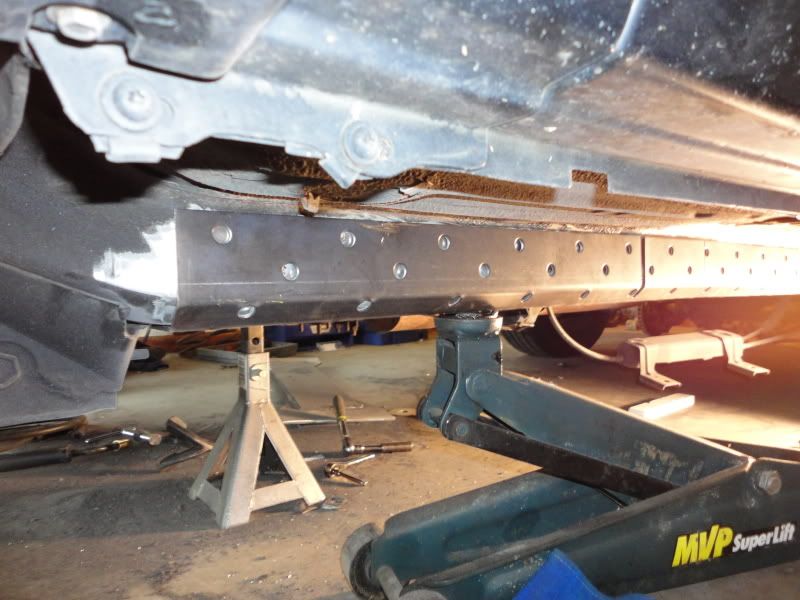
Using the factory crossmember bolts to get the stiffener located properly i used a floor jack to provide enough pressure for a tight fit. The tighter the fit the more support it will provide and the plug welding process will be much easier.
Since every xj frame is a little bit different due to mileage, accident history etc, the stiffener may require some massaging with the BFH for an exact fit. I tacked it on along the edges and a few plug welds per section to secure it. Moving towards the rear i used the floor jack to provide the pressure to form it to the bend in the frame, continuing to tack the edges in along with some of the plug welds. Once the entire stiffener is in place the plug weld-a-thon starts.
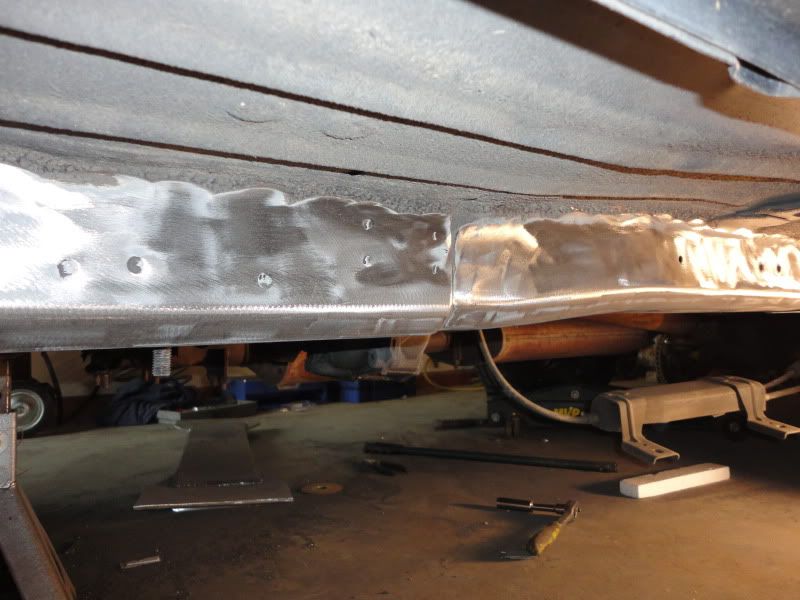
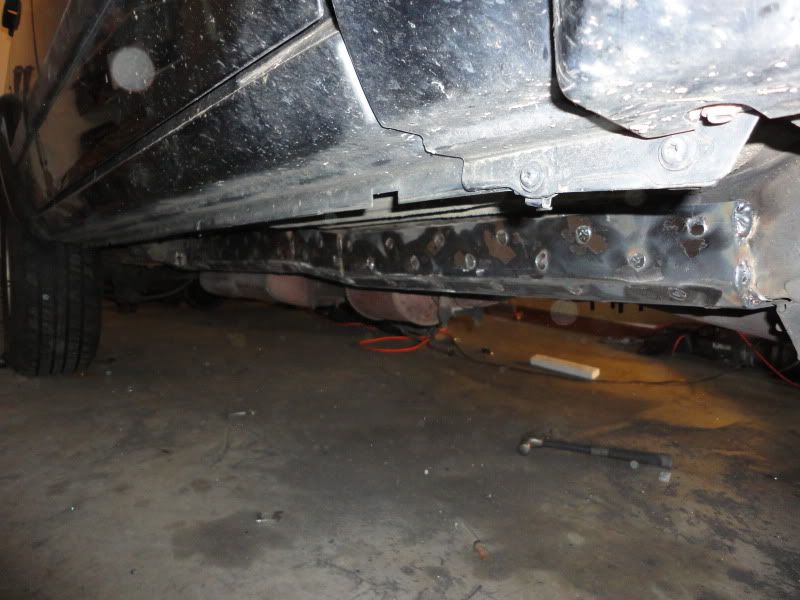
Dont be in too big of a hurry to finish the rosettes, i let each one cool a bit before starting the next one and worked my way towards the center. After doing two or three sets of these i've found its best to do each hole in halves, top half first then fill in the bottom. This prevents the frame material from burning through. Finally i welded the front and rear edges, and welded 6-8 inch sections every 2 inches along the inside for even more support. Here is the finished rail after cleaning with a flap disc, make sure you paint it well to protect against rust.

Conclusion
Ive run these stiffeners in my previous rig and have been more than satisfied with the support they provide the xj unibody. In this jeep they provided a good solid mounting point for the new 2x6x3/16 crossmember and i can already feel the difference daily driving it. After building xj's for the past 5 years it's my opinion that this should be the first modification to any jeep that will see offroad use, and it will prolong the life of the body under varying degrees of abuse. Weekend wheeler or full on chopped up and built, every xj on the trail can benefit from a set of frame stiffeners underneath.

Thursday, May 26, 2011

How To Make Your Own Chrysler 8.25 Adjustment Tool

The Chrysler 8.25 is one of the most common axles found in jeep cherokees. The 97+ version has 29 spline count axles and is comparable in strength to the xj d44. This c-clip axle has no carrier break and will support gears as deep as 4.88, and is well supplied by the aftermarket for differential and locker options. For the casual wheeler running 35's and under this axle can be a great, low cost, and readily available option to provide reliable strength.
In place of the dana style shims the 8.25 uses threaded adjusters on the outside of the carrier bearings to adjust backlash and bearing preload. These adjusters are threaded into the housing and bearing cap and the tension of the bearing cap locks them in place

These can be adjusted in and out using a spanner tool from the side, or for about 15$ you can build a tool to adjust it with a ratchet down the axle tube. To do this i used a 7/8 grade 5 nut, a section of 1/2" black pipe (schedule 80 from lowes) and a cheap 3/8 extension.
This is very simple however i thought it would be a good idea to detail the adjuster for anyone who wants to sink their teeth into axle building. I started by welding the nut square to the end of the tube. The adjuster opening is slightly smaller than 7/8 so some time with the flap disc on each ensured a nice fit in the adjuster.
Finally cut it to length and weld the extension in the other side, the head of the 3/8 extesion should fit flush with the pipe. Just remember when cutting the tool to length leave enough to handle it outside the tube so you can hold onto it to leverage and it doesnt have to ride against the axle seal. In total i spent more time typing this how to than it actually took to make the tool and being able to adjust the axle with a ratchet is worth the 15$ spent on the parts. If your a first time axle builder and have been looking for a good how to on this i hope ive been able to help..... keep on building!